Thursday, February 28, 2019

5 Reasons Your Natural Hair Is Not Retaining Length

IG @hennalice_

by Sabrina Perkins of SeriouslyNatural.org

Many in the natural hair community are consumed with hair growth but the real concern should be on hair retention. Your hair IS growing and while there are four stages of hair growth, and while all are not growing phases, they continue throughout our lives.

While hair growth does slow down as we age, hair growth can be hindered by things like manipulation, weather, hormones, illness and medications, too. Despite all that, hair growth continues on in these four stages illustrated below:


Photo courtesy of viviscal.com

So, why is your hair staying at only one length? Your hair is not retaining length-- it's breaking off as fast as it's growing. Length retention is holding onto your hair longer and that means caring or keeping the oldest hairs (the ends) in better condition and healthier. If you are struggling with this, then are five reasons you are probably losing your length.

Continue!>>>


Over-Manipulation
We love our hair and we love how much versatility it gives us in styling but many of those styles require a lot of manipulation and damage. The more textured the hair, the less the manipulation it can handle and often why many naturals (especially women with 4c hair) opt for protective styling.

Straight styles and wash and gos are often considered styles that have a lot of manipulation but honestly, just keeping your hands out of your hair (hands in hair syndrome) and being gentle with your strands will keep your damage to a minimum. The bottom line is that even washing our hair (a true necessary evil) is damaging to our delicate strands. Just use as little manipulation as possible when caring for your tresses.

Not Maintaining Balance
Moisture vs. Protein balance is crucial to healthy hair. Natural hair needs moisture to stay elastic and hydrated and that leads to less damage. Hair is made up of a hard protein called Keratin and protein helps to strengthen our strands. There is a fine balance between the two. Too much moisture and hair becomes limp and can suffer from hygral fatigue (strand to weaken and eventually break). Too much protein and you can make hair brittle and cause breakage.

Maintaining moisturized and strong hair takes listening to your hair so you know what it needs and when it needs it. Either extreme can and will cause breakage so keep that balance equal and you will find your length retaining.

Heat Styling
Heat styling is one of the quickest ways to damaging natural hair. You can incur severe damage or something even worse--heat damage. Heat damage can not be reversed either so the best way to fight heat damage is to limit your heat styling (flat irons, blow drying without a diffuser or using a hot comb) and to never get heat damage in the first place).

The dryness that heat styling also creates can cause hair to pop or break as it whisks away the moisture and elasticity. Also, there is not such thing as heat training. If your hair will not revert to it's regular texture it is heat damaged. If you must use direct heat, make sure to use a good hair protectant and use the lowest setting possible.

Not Getting Trims
Trims are a necessary component of healthy hair are maintenance. Some see them as a nuisance or counterproductive to long hair but they keep hair from splitting and become more damaged. They also help with raggedy ends that can cause more tangles and knots. I opt for two trims a year and my hair is growing steadily. The more chemicals or manipulation to your hair requires more trims but we do not need to trim our hair as often as we did when we were relaxed.

Neglecting Your Ends
As I mentioned earlier, our ends are the oldest hair and that makes them the most vulnerable to damage and the weakest. Seal them, be gentle with them and protect them at all costs as they are the troopers that keep our length retaining possible.

Once hair is moisturized (including your ends), you need to retain it so concentrate your efforts heavily on your ends and begin to notice how they stay healthy and remain on your head and not in your shower, sink or floor.

What are your tips for retaining length Naturals?


from Natural Hair Care | Curly Nikki https://ift.tt/2foPz5n

Rejuvenate Your Natural Hair and Scalp with THIS Ingredient!

@dennydaily

by Sabrina Perkins of SeriouslyNatural.org

Coffee is what gets me going in the morning but this amazing beverage should not just be limited to your morning Joe. Yes, coffee has excellent benefits for your skin and hair and since almost everyone has some in their home, it is easily accessible and ideal for DIY recipes. From hair rinses to scalp exfoliates, coffee is the gem you never realized you had or needed for healthy hair.

Continue!>>>


Grown in around eighty countries in Africa, Asia, the Caribbean and south and Central America, coffee comes from the coffee tree which is a tropical evergreen shrub and the two most commercially important species grown are the Coffea Arabica and Coffea canephora. Coffee has numerous benefits from helping with depression to liver disease, coffee has antioxidants, anti-inflammatory and anti-cellulite properties which are all ideal for perfecting skincare.

Coffee also has caffeine, a white crystalline powder that is a naturally occurring stimulant, and is excellent for penetrating the hair follicles and stimulating them. Caffeine can also add a natural sheen to hair but many use it to help in slowing down hair loss while speeding up hair growth with hair follicle stimulation.

Rejuvenate Your Hair & Scalp With Coffee

Coffee can be used as a scalp exfoliate, a hair scrub and a hair rinse with each helping by stimulating hair growth. The exfoliate properties help to remove dead skin cells, dirt, dandruff, oil and even product build-up which can clog your scalp’s pores. Here are some DIY recipes for all three that will change your hair and coffee game drastically for the better.

Condish + Coffee Scalp Scrub
Simply add some coffee grounds to your favorite deep conditioner to the point of feeling the grounds and mix. Apply the mixture to the scalp using circular motions while leaving on scalp for five to ten minutes. Rinse off and wash hair with shampoo before styling as usual.

Coffee Scalp Scrub
4 tbsp. of favorite carrier oil (coconut or olive preferred)
6 tbsp. very fine coffee grounds (previously brewed is fine)
A few drops of tea tree oil

Mix all the ingredients well and store in an airtight container at room temperature or store in fridge. Scoop out enough to apply to scalp and massage for five to ten minutes before rinsing well and washing hair with shampoo. This is an excellent recipe for a face scrub too.

Coffee Hair Scrub
2 tsp. of coffee grounds
2 tsp. raw honey
2 tsp. of olive oil

This DIY recipe is great for reviving dry, dull hair. Mix all three ingredients well and apply to strands and scalp. Make sure all strands are covered and massage into scalp in circular motion for a few minutes. Rinse well and shampoo before styling as usual.

Simple Coffee Hair Rinse
Simply brew some strong coffee and allow to cool. Shampoo hair as usual and take the cool coffee and pour over your head. You can use a big bowl under your head to capture the excess and re dump over your head again for added coverage. Place hair in shower cap and let sit for up to an hour. Rinse out with warm water and allow to air dry or style as usual. This will help darken hair (may not be ideal for lighter-colored women), add shine and help strengthen your strands.

If you just want the exfoliating effects of coffee for regular cleansing and conditioning, simply add some grounds to your shampoo or deep conditioner bottles to boost your products ability to exfoliate and aid in hair growth. I know I talk about coffee A LOT, but it needs to be a regular in your beauty regimen because it's so simple to use, inexpensive and has a host of amazing benefits.


Which DIY mentioned are you going to try?


from Natural Hair Care | Curly Nikki https://ift.tt/2guSsG7

Glute and Hamstring Workout

Jessica Gouthro from Paleohacks is joining us today to offer tips for strengthening glutes and hamstrings without traditional gym equipment. Enjoy, everyone.

Strong glutes and hamstrings are more than just nice-looking legs and a booty.

The glutes and hamstrings are the strongest muscles in our skeletal muscular system. When we strengthen these muscles, we can prevent strain and injury while also enjoying a greater ability to squat deeper, lunge pain-free, push heavy objects, run faster and jump higher.

To best train those glutes and hamstrings, you’ll want to emphasize both leg curling (knee bending) and hip extension (or straightening) actions for balanced training. One of the best exercises that do this is the glute ham raise, or GHR.

Very few exercises can isolate the hamstrings and glutes without top-loading excess weight on the spine or testing your grip strength with a loaded barbell. Although you may think this exercise looks easy in comparison to a Barbell Romanian Deadlift or Hip Thrust, it is just as challenging (if not even more so) when performed correctly.

What Is a Glute Ham Raise?

A glute ham raise is an eccentric, or muscle lengthening, exercise that involves a fixed location of the feet, ankles, and hips and a hinge only at the knee joint. By securing the foot position and starting with a bent knee, we enable the hamstring to lengthen eccentrically against gravity using only our own body weight.

Rising back up to the starting position is done by a combination of hamstring contraction and assistance from the upper body pushing against the floor.

Typically, this exercise utilizes specialized equipment called a GHR machine (pictured) that can hold your feet and ankles in place and cushions your knees with a curved, shaped knee pad.

Since you may not have access to one of these in your home or gym, we have a great alternative you can do with a partner. All you need is a friend and a rolled-up towel to cushion your knees!

Partner Assisted Glute Ham Raise | 6 reps

Kneel down on a rolled-up towel. Tuck your toes under and straighten your hips. Lift your hands up in front of your shoulders and tighten your core.

Have your partner press down firmly on your ankles to secure your position. Keeping your hips and glutes tight, inhale as you slowly lean forward, hinging only at the knees.

Once you can no longer control the descent, use your hands to catch yourself and lower the rest of the way down. Push into the floor with your hands, and on an exhale, contract your glutes and hamstrings to rise back up to the starting position.

Complete six reps while your partner holds your ankles steady.

Note: This is an advanced exercise. If you find this exercise too challenging and cannot complete six good reps, you can try this next partner-assisted resistance band hamstring curl exercise as an alternative.

Partner-Assisted Kneeling Band Hamstring Curl | 8 reps per leg

Kneel down on a rolled-up towel, tuck your toes under, and get into an all-fours position. Extend one leg straight out behind you.

Have your partner loop a resistance band around your heel, just above your shoe. As your partner holds her end of the resistance band tight, bend your knee to curl your heel towards your butt.

Exhale and hold momentarily at 90 degrees, then slowly straighten to return to the starting position. Continue to bend and straighten your knee while maintaining that lifted leg position. Complete eight reps, then switch sides.

Note: You will feel this in your glutes on both sides as well as in your hamstring.

In case you don’t have a partner available, here are the five best glute and hamstring exercises you can do anywhere, by yourself. You’ll need a yoga mat, a towel, and an exercise band.

To get the most out of your efforts, I recommend performing all of these exercises at least two to three times per week.

Fire Hydrant | 10 per side

Kneel down in an all-fours position with your feet flexed (toes pointing to the floor). Lift one knee up and out to the side to hip height. Exhale at the top as you flex your glute muscles, then lower back down with control. Maintain a steady torso and upper body as you focus on contracting your glutes.


Complete 10 reps on one side, then switch to the other leg.

Note: Work slowly to ensure quality muscle contractions. Pause each time you hit the top and strongly contract your glutes. You’ll feel this on both sides, even though you’re working one side at a time.

Towel Slide Hamstring Curl | 8 reps

Sit at the bottom edge of your mat with the full length of your legs on a smooth surface floor, like hardwood or tile.
Lie down flat on your back and press your palms into the floor by your hips.

Place your heels on a towel and keep your feet flexed. (If you are working on carpet, use a piece of paper or two paper or plastic plates instead of a towel.)

Engage your glutes and lift your hips off the ground. On an exhale, bend your knees to slide the towel towards your butt. Stop when your knees reach a 90-degree bend. Inhale, and reverse by sliding back out to a straight body.

Complete eight reps, keeping your hips elevated the entire time.

Single Leg Toe Touch | 6 reps per side

Stand tall with your core tight and shoulders rolled back and down. Balance on one foot as you float the other just off the ground.

Inhale to hinge at the hips to tilt forward until your torso and top leg are parallel to the ground. Keep a slight bend in your standing leg and reach your fingertips towards your toes. Exhale to lift back up to standing, contracting your muscles.

Complete six reps per side.

Note: Keep your gaze on the ground to help with balance. If balance is still a challenge, you may hold onto a wall or chair with one hand while you do these reps.

Single Leg Balance Hamstring Curl | 6 reps per side

Balance on one leg with your torso and lifted leg parallel to the ground. Keep a small bend in your standing leg, and grab onto your quad for stability. On an exhale, curl your top leg towards your butt, while maintaining your hip and torso position.


Inhale to straighten your leg, reaching it out long behind you.

Continue six reps on one side, then complete six reps on the other side.

Single Leg Resistance Band Ham Curl | 6 reps per side

Slide one end of your loop resistance band underneath your left heel, pressing down with your heel to secure its position.

Lift your right leg. Loop your right heel through the other end of the band, positioning it on the back of your shoe. Place both hands on your left knee and hinge at your hips with your spine straight.

Exhale to bend your right knee to 90 degrees, then inhale as you lower back down with control, maintaining a small amount of tension on the band so it does not come loose. Your range of motion should be about eight to 10 inches.

Complete six reps, then switch sides.

Note: Hold onto a wall or a chair for balance if you need to.

How To Incorporate This Weekly Workout

Here’s a sample workout you can incorporate into your weekly routine.

Warm up with three minutes of light walking or jogging. Follow with three rounds of the circuit of seven exercises, resting for 10-30 seconds between exercises depending on your fitness level.

Note: Beginners can do just one round and work up to three rounds after a few weeks.

  • Partner-Assisted Glute Ham Raise [OR] Partner Assisted Kneeling Band | 6 reps
  • Hamstring Curl | 8 reps per leg
  • Fire Hydrant | 10 per side
  • Towel Slide Hamstring Curl | 8 reps
  • Single Leg Toe Touch | 6 reps per side
  • Single Leg Balance Hamstring Curl | 6 reps per side
  • Single Leg Resistance Band Ham Curl | 6 reps per side

Thanks again to Jessica Gouthro for these tips and to Brad Gouthro for demonstrating them. Be sure to check out Jessica’s other workout lineups on MDA:“Arm Workout Without Weights,” “13 Ways To Move More At Work” and “10 Moves To Help Ease Joint Pain.”

Questions or comments about exercises or glute and hamstring strength? Share them below, and thanks for stopping by.

The post Glute and Hamstring Workout appeared first on Mark's Daily Apple.


from Mark's Daily Apple https://ift.tt/2XwxNDN

Wednesday, February 27, 2019

How to Grow Long Hair: 8 Things You Should Never Do

@marie_amor

by Sabrina Perkins of SeriouslyNatural.org

How to grow long hair seems to be a mystery to so many new and veteran Naturals. For some, it’s a myth that only seems to exist on the likes of YouTube and Pinterest but not necessarily on their head. However, beautiful, long, natural hair is not a fairy-tale. Long, natural hair does exist, but these natural locks are not something that just happens overnight or by the luck of a braid or twist.

No, the women you see with long hair are consistent in their efforts, and while they undoubtedly did make a few mistakes along the way, they also learned what not to do along the path to growing long, natural hair.

Here are eight things you should NOT do when trying to grow long natural hair.

Continue!>>>


Never Ignore Your Hair Type
The most important thing for you to do is to identify and accept your natural hair type. You must understand your hair texture before you can ever begin to love and care for your hair. Failure to take this step could lead to some missteps including buying and using the wrong products or inadvertently damaging your hair.

Understanding your hair type will allow you to not only create or purchase the right products for your hair but will spare you a fair amount of frustration. Yes, there are some who find hair typing unnecessary but finding persons on Youtube or bloggers with the same texture as yours helps in narrowing down what may work for you. Always remember that trail and error will be the only way you find out your Holy Grail of products and routines.

Do Not Skimp on Establishing a Hair Care Regimen
One of the common denominators that many Naturalistas point to as critical components in their hair’s growth factor is a consistent hair care regimen.

Examples of a regular hair washing regimen might include but is not limited to any of the following:

• Pre-Poo then wash hair every week with a moisture-rich shampoo and deep conditioner or;
• Washing hair every week with a moisture-rich shampoo plus use of a deep conditioner and alternating each week with a protein treatment or;
• Washing hair every week with a moisture-rich shampoo and conditioner and alternating every other week with a deep conditioner.

Regardless of the hair care regimen you establish for your hair, pay attention to how your hair responds to the regimen, the products that you use and adjust periodically. Some natural divas find that using a co-wash in between shampoos works well for their hair while others use clarifying shampoos periodically to remove product buildup.

Next, know your hair oils and which oils work best for your hair type. Did you know that certain hair types respond differently to certain oils? Your oil choices can have a significant impact on how much moisture your hair retains as well as the degree of shine visible in your hair.

Do Not Forget to Test Your Hair Porosity
Hair porosity is essential to understanding if your hair is moisture-rich or if it is in desperate need of a protein treatment. Testing hair porosity is a simple process. First, ensure that your hair is clean. Your hair should not have any products on it. Next, get a glass of lukewarm water. Take a strand of your hair and gently submerge it in the glass of water, just enough so that it is not floating on top of the water. If after 10 minutes, your hair sinks to the bottom, your hair has high porosity. If your hair floats to the top, it has low porosity. Hair that falls to the middle of the glass has normal porosity.

If your hair has low porosity, it is desperate need of moisture infusion, and therefore, you should get a moisture-rich shampoo and deep condition your hair. If your hair has high porosity, it may be susceptible to damage thanks to it having too much moisture. This high level of porosity may be indicative that your hair could use a good protein treatment and that you need to temporarily stay away from those excessively long applications of conditioner in your pre-poo mix. Do not forget to test your hair on a regular basis because things could quickly change. Moisture control is critical.

Do Not Forget to Protect Your Natural Hair
That’s right! Natural hair is especially susceptible to breakage thanks to its curly, coily, kinky textures. Make sure you cover or wrap your hair up each night with a satin scarf or bonnet. Not a fan of the satin headdress? Invest in a satin pillow case to protect your hair from tangles and breakage.

If you decide to get flat iron your hair, make sure your hair is ready for heat (i.e. no damage and rich with hydration) and that it has thermal protection.

Do Not Skip Trimming Your Ends
Do not skip getting your ends trimmed. Even natural hair should undergo a trim a few times a year (more if using heat, chemicals or excessive manipulation) whether you are wearing protective styles or twist-outs.

Do Not Over Manipulate Your Natural Hair
Avoid over-manipulating your hair as it can create excessive damage. If you must comb your hair, use a wide-tooth comb or your fingers. Excessive manipulation of your hair will impede hair growth progress thanks to shedding and expose your fragile ends to splitting and dryness.

Do Not Ignore Signs of Hair Damage
Hair that is dry or crunchy, brittle to touch or shedding may be indicative of hair damage. Take the time to treat the problem so that you stay on top of breakage and enable your hair to continue growing. Damage never just goes away so address and fix it before it gets worse.

Do Not Forget to Care for Your Hair –Even When Wearing Protective Hairstyles
Protective styles can lead you into falsely thinking your hair does not require a whole lot of your attention. In reality, this is the time to ensure that your scalp and hair are healthy during this time. Maintaining a healthy scalp and hair entails applying natural oils to prevent dryness of both the hair and scalp.

These are eight things you should avoid doing if you want to grow long healthy hair. Do you have some long hair growing tips?


from Natural Hair Care | Curly Nikki https://ift.tt/2cqrmQj

3 Must-Have Deep Conditioners to Strengthen Hair & Prevent Breakage


IG @ina90skindaworld

by Sabrina Perkins of Seriouslynatural.org

In the pursuit of a healthy hair journey, many Naturalistas face dry hair which can also lead to breakage which nobody wants. The following three deep conditioners help to prevent breakage, strengthen and add moisture to dry hair thanks to the emollients, humectants and hydrolyzed proteins.

Continue!>>>
Aphogee’s Curlific texture treatment is packed with proteins for strength, emollients for shine and humectants for softness. Although this treatment is serious care for textured hair, it is still possible to use it every week to maintain beautiful hair regardless of the environment around you or your styling regimen.

A few of the emollients that are in this treatment are dimethicone, stearyl alcohol, cetyl alcohol, shea butter, mauritia flexuosa fruit oil and hydrolyzed proteins. These emollients are used as lubricants and they provide large amounts of slip to help with detangling.

The humectants that are used in this treatment are able to draw moisture from the air to make hair even softer. The humectants in Aphogee’s Curlific texture treatment are panthenol and glycerin. Panthenol strengthens and repairs chemically damaged hair and it also binds to the hair follicles. Glycerin has the ability to define curls. This treatment has beneficial proteins such as hydrolyzed quinoa, hydrolyzed vegetable proteins and keratin amino acids. Quinoa contains all eight essential amino acids. It has the ability to assist in hair repair, protection and it conditions the hair. When hair is treated with hydrolyzed quinoa, it retains moisture shows less signs of damage and has better protected cuticles.

The benefits of hydrolyzed quinoa are easier detangling, improved shine, softer hair, it binds moisture to the hair strands and soothes an irritated scalp. Vegetable hydrolyzed proteins penetrates hair adding strength and shine. Keratin amino acids is a powerful moisturizer that can penetrate the hair. The proteins are small enough to penetrate the hair shaft and coating damaged allowing styles to hold.

Kinky Curly Stellar Strands Hydrating Deep Treatment
This treatment is enriched with emollients like macadamia oil and argan oil. This is an intense hydrating treatment and the benefits of using this treatment rejuvenates and moisturizes weak strands, improves elasticity, reduces breakage and maintains your hairs natural shine, silkiness and softness.

The humectants found in Kinky Curly Stellar Strands Hydrating Deep Treatment are glycerin and panthenol. Panthenol has the ability to reduce split ends. Although glycerin has the ability to define your curl pattern if it’s used in the wrong way it can lead to damage. The main proteins in this treatment are silk amino acids and collagen amino acids. These proteins improve elasticity and reduces breakage which helps with length retention.

Kinky Curly Stellar Strands Hydrating Deep Treatment is rich in biotin which helps with hair growth and thickens the hair. This is a “must have” in every Naturalista's product stash.

Nothing But: Intense Healing Mask

This intense healing mask not only strengthens but also repairs weak and fragile hair making this mask real help for transitioning hair. Nothing But: Intense Healing Mask is made with simple ingredients that penetrates deeply to repair, soothe, and smooth damaged brittle hair.

Some of the emollients are cyclopentosiloxane, dimethiconal, cetearyl alcohol, soybean oil, shea butter and wheat germ oil. These emollients offer shine, help in detangling and strengthens the hair. This mask has panthenol as a humectant which also thickens hair strands and enhances gloss and elasticity. The proteins found in this treatment are collagen amino acids and hydrolyzed keratin. Collagen maintains the elasticity in hair and hydrolyzed keratin reduces frizz and static electricity caused by dryness.

Nothing But: Intense Healing Mask also contains oils like jojoba oil, which is close to the natural oils (sebum) that our scalp produces. It also has Tocopherol acetate (Vitamin E) which is a natural preservative. These three deep conditioners will definitely strengthen the hair and they are all made with natural ingredients, free of sulfates, parabens and mineral oil. Although these three deep treatments all have emollients, humectants and proteins, I definitely feel a difference between them.

My first choice would be Aphogee’s Curlific texture treatment. It is quite affordable (approximately 9$) and even though it is a strong treatment packed with proteins, it still has enough moisture to be able to use it every week. My second choice would be Kinky Curly Stellar Strands Hydrating Deep Treatment Although it has a thick consistency and leaves my hair soft it came in second because it is quite pricey (approximately 13$). It enhances your natural shine (thanks to the argan oil) and leaves your hair feeling stronger. My third choice would be Nothing But: Intense Healing Mask

It is also affordable (approximately 11 dollars) leaving your hair strengthened and it definitely helps with breakage and shedding. All of these deep conditioners are a good balance between protein and moisture making it possible to use often.


What is your favorite deep conditioner?


from Natural Hair Care | Curly Nikki https://ift.tt/2b9ESVt

Can Keto and Cardio Mix?

We get lots of questions about how a ketogenic diet works in the context of exercise: Is it possible to maintain one’s fitness (strength, endurance, performance) and also drop one’s carb intake to ketogenic levels? Is it advisable? Will it help me lose weight faster?

Mark already addressed some of these topics, but it’s clear that many people still feel uncertain about how to pair a keto diet with their current workout routine.

Rather than write a single behemoth post, I’m going to tackle this in two parts. For today, let me talk keto and cardio, specifically how keto works for the average fitness enthusiast who thinks more in terms of general exercise. In a couple weeks I’ll follow up with a post on keto for runners and other endurance types who tend to focus on training programs and racing.

So, keto and cardio… This is for people who like to attend group fitness classes, or go out for jogs or spins on the bike, or do a mix of low heart rate exercise with occasional bouts of HIIT. (This is a problem with the term “cardio”—it can mean so many things.)

You probably already know Mark’s stance on cardio: avoid chronic cardio exercise patterns. The Primal Blueprint approach to exercise comprises lots of everyday movement, lifting heavy things, and occasionally going all out. If you simply must do cardio, most of these sessions should be conducted at an aerobic heart rate not higher than 180-age, as detailed in the Primal Endurance book. So, with the caveat that cardio exercise in the traditional sense of slogging away on an elliptical machine or treadmill doesn’t jibe with the Primal Blueprint approach, let’s get to some frequently asked questions.

Will My Workouts Suffer When I Go Keto?

This is a common concern because some people do report that they feel sluggish when they first go keto. And yes, you might feel like your performance in the gym (cardio, strength, HIIT—all of it) takes a hit in the first few weeks of keto. Rest assured that this is a temporary dip as your body becomes efficient at using fat and ketones for energy in the absence of incoming carbs (glucose). It’s a learning process for your body, so to speak.

The more glycolytic your workouts, the more you are going to notice this. Prolonged, difficult workouts that fall into the category of chronic cardio or “black hole” sessions are especially likely to suffer.

To help mitigate temporary performance decrements during the transition to keto:

  • Dial back the intensity and/or frequency of your workouts for a few weeks. Trade some of your more intense cardio (and strength) sessions for walks, yoga or Pilates, or other gentle forms of movement.
  • Mind your electrolytes. If you are feeling weak or lightheaded, if you get a headache, or you just feel “off,” this is likely due to electrolyte imbalance. Try adding ¼ – ½ teaspoon of salt to a glass of water with lemon juice and see if that helps. You want to make sure you are getting 4.5 grams of sodium, 300-400 mg of magnesium, and 1-2 grams of potassium each day on top of your normal food.
  • While your body is making the switch, give it plenty of fuel. Consume extra fat and eat plenty of calories. If fat loss is a goal, you can adjust your macros and calories as needed once you are feeling in the groove with keto.
  • Tough it out. Don’t cave and add carbs in the first few weeks (see the next point). Know that this is temporary, and you should be back to normal within three to six weeks.

Do I Need To Add Back Carbs To Fuel My Workouts?

During the first few weeks of starting keto, you should not add back carbs. It is important to create a low-glucose, low-insulin environment to promote ketogenesis and the adaptations that accompany a ketogenic state. If your workouts are too hard right now, the correct answer is to change your workouts, not to increase your carbs.

After you have done a dedicated period of a minimum three weeks of strict keto—six or more is even better—you should be feeling better during your workouts if you are not engaging in prolonged, chronic cardio activities. (It might take longer to adapt to longer endurance training, as we will discuss in the next installment.) At this point you have some options:

One, you can continue in strict ketosis (less than 50 grams of carb per day) as long as you are feeling good.

Two, you can start experimenting with eating carbs strategically before your workouts. This is known as a targeted keto approach. There are various ways of implementing this, but the basic formula is that you would ingest 25-30 grams of glucose or dextrose (not fructose) about half an hour before high-intensity workouts to replenish muscle glycogen.

There are a few caveats here. First, most sources of glucose/dextrose are not Primal (think hard candy, gels). Probably the closest is pure maple syrup, but that also delivers a hit of fructose. If you are a Primal purist, you will have to decide if this is a compromise you want to make. Second, people tend to overestimate the degree to which they are actually low on glycogen and how much it matters. It is a common misconception that once you go keto you have “no glycogen.” While muscle glycogen stores are reduced, your tanks are probably still at least 50% full, and perhaps on par with non-ketogenic folks if you have been keto for a long time. Furthermore, the average low-to-medium intensity cardio session isn’t truly depleting glycogen. Remember, the point of becoming fat- and keto-adapted is that you burn predominantly fat and ketones at these lower intensities, sparing glycogen. You have to go hard and/or long to really burn through your muscle glycogen stores. Thus, you should target pre-workout carbs only before truly high-intensity sessions.

Instead of adding simple carbs before workouts, another option if you feel like you need more carbs is to add back nutrient-dense carbs after workouts, when insulin sensitivity is increased. This might make sense if you feel like your ability to recover between workouts is lagging, or you want to recover quickly because you have back-to-back hard sessions planned. In either case—adding carbs before or after exercise—the amount you add should be proportional to the difficulty (intensity) of the workout. You don’t need to carb up for your yin yoga class, for example.

Lastly, if you are feeling underpowered during exercise, instead of adding back carbs you can experiment with adding more protein and/or fat. Some people report good success with “protein ups” timed around heavier workout days.

Will Adding Keto to My Cardio Routine Help Me Lose Weight?

Maybe. It’s a common refrain that “abs are built in the kitchen,” meaning that your food plays a bigger role in fat loss than does your exercise. This isn’t to say exercise is unimportant; it does matter. A caloric deficit is necessary to lose body fat, and exercise is one way to create a caloric deficit. However, this can also backfire if your exercise routine leaves you hungrier, so you unintentionally overeat calories due to increased hunger and cravings. Ketones have known appetite suppressing effects, so a ketogenic diet might help counteract any increased hunger that comes with exercise.  

That said, I think the root of this question is the fact that ketosis is a fat-burning state, and so the logic goes that if you are metabolizing fat for energy, you will automatically shrink your body fat stores. Moreover, if you add keto and cardio together, especially if you are exercising in the so-called “fat-burning zone,” you will lose more fat than either alone. Right? Not necessarily. The fat you burn can come from your adipose tissue or from your plate. If you are eating an excess of fat calories relative to your daily caloric needs, you still won’t lose body fat.

We know that for body recomposition, the best bang for your buck comes from a combo of resistance training and HIIT. Cardio exercise still has many benefits for physical and mental health, and of course a lot of people simply enjoy their cardio; but you shouldn’t be putting all your eggs in the cardio basket if fat loss is your goal. All else being equal, though, it certainly can’t hurt to upregulate your body’s ability to use fat for energy.

Summary Recommendations:

  • When first starting out with keto, follow the recommendations laid out in The Keto Reset Diet, and be strict for at least three weeks.
  • If you are struggling in your cardio workouts during this period, don’t add back carbs! Dial back your workouts, add calories (via fat or protein), or both.
  • Once you believe you are keto-adapted, then you can start to experiment with targeted carbs and/or carb ups if you so choose.
  • No matter your diet, avoid chronic cardio exercise patterns that increase stress and your body’s demand for glucose.
  • Check out this post for additional tips for exercising while keto.

Thanks, everyone. Questions, comments? Share them below, and have a good week.

References:

Koeslag T, Noakes T, Sloan A. Post-exercise ketosis. J Physiol 1980;301;79-90.

Malhotra A, Noakes T, Phinney S. It is time to bust the myth of physical inactivity and obesity: you cannot outrun a bad diet. Br J Sports Med 2015;49:967-968.

Matoulek M, Svobodova S, Vetrovska R, Stranska Z, Svacina S. Post-exercise changes of beta hydroxybutyrate as a predictor of weight changes. Physiol Res. 2014;63 Suppl 2:S321-5.

Newman JC, Verdin E. ?-hydroxybutyrate: much more than a metabolite. Diabetes Res Clin Pract. 2014;106(2):173-81.

Sleiman SF, Henry J, Al-Haddad R, et al. Exercise promotes the expression of brain derived neurotrophic factor (BDNF) through the action of the ketone body ?-hydroxybutyrate. Elife. 2016;5:e15092.

The post Can Keto and Cardio Mix? appeared first on Mark's Daily Apple.


from Mark's Daily Apple https://ift.tt/2Nz2zro

Famous Jazz Guitarists and Their Guitar Gear

Are you wondering how to get a good jazz guitar tone? On this page, you will learn how your favorite jazz guitar player gets his unique sound, besides using his ears and fingers. Discover what kind of guitars, guitar amps, strings, picks and effects the jazz greats use.

Jazz Guitar Players

  1. Joe Pass
  2. Pat Metheny
  3. Wes Montgomery

Joe Pass’ Guitar Gear

Joe Pass – Guitars

Fender Jazzmaster

Joe Pass used to play a Fender Jazzmaster during his stay at the Synanon Center in California, where he tried to kick drugs.

After 15 months in Synanon Joe Pass recorded Sounds of Synanon in 1961 together with Arnold Ross, another Synanon resident. During his stay Joe Pass didn’t have a guitar of his own, he used this Fender guitar that was owned by the Synanon Rehab Facility.

The Fender Jazzmaster was first introduced in 1958 and was originally marketed at jazz guitarists. However, The Jazzmaster wasn’t embraced by the jazz musicians, but it became popular amongst surf rock guitarists.
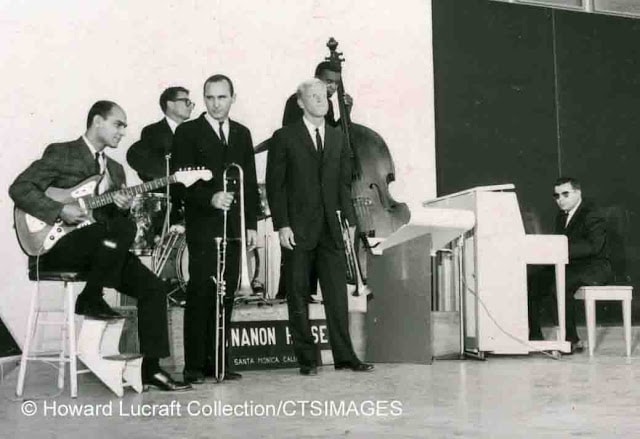
 

Joe Pass with his Fender Jazzmaster


Gibson ES-175

This Gibson guitar, the ES-175, was the main guitar of Joe Pass. He got one for his birthday from a guy named Mike Peak in 1963, who saw Joe Pass playing jazz on a solid body (the Fender Jazzmaster).

Other jazz guitarist who played the Gibson ES-175 include Jim Hall, Pat Metheny, Wes Montgomery (in the early days), and Kenny Burrell.


D’Aquisto Guitars

Joe Pass D'Aquisto guitar

In 1970 Joe Pass started playing a D’Aquisto guitar. The guitar had one pickup and was built specifically for Joe.

A good example of the D’Aquisto at work is Two For The Road, a duo album with Herb Ellis.


Ibanez JP20

From 1980-90 Joe Pass was under contract with Ibanez and they made him a signature model based on his D’Aquisto.

It is said that Joe didn’t really like his Ibanez signature guitar and he didn’t perform on it that much.

Most accounts from people in the United States from this time period have Joe playing the D’Aquisto, but many reports from other countries say Joe played the Ibanez. The speculation is that Joe played the Ibanez rather than travel internationally with his D’Aquisto.

The Ibanez JP20 was discontinued in 1991 and suffers a reputation for a thin tone due to its pickup placement (too much in the middle, not close enough to the neck).
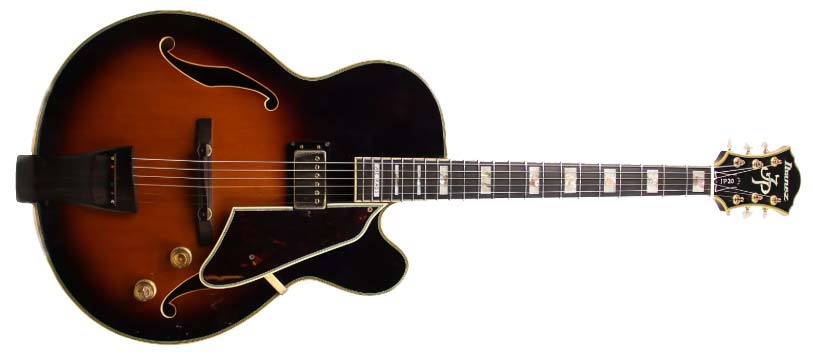
 

Ibanez JP20


Other Guitars

  • 1901 Martin 00-42 – Joe played this guitar when he was young.
  • Gibson L5
  • Gibson Super 400


Joe Pass – Amps

Polytone Mini-Brute

Joe Pass used a Polytone Mini-Brute amp, a compact solid state amp with 110 watts going through a 12″ speaker.

Other jazz guitarists using this amp include Jim Hall, Herb Ellis, and George Benson.
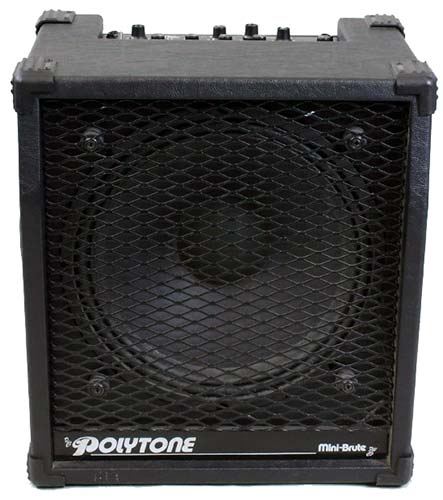
 

Polytone Mini-Brute


Joe Pass – Strings

Joe Pass used D’Aquisto Flatwound Strings with a 013 to 056 gauge.


Joe Pass – Picks

Joe Pass used a medium thin gauge pick, not soft, but firm. In an interview, he says he always uses the same kind of pick, broken in two.

Pat Metheny’s Guitar Gear

Pat Metheny guitar gear

Pat Metheny was one of the pioneers of using electronic equipment in his music and until now he’s always been looking for innovative instruments.

The first ten years of his musical career he wouldn’t play anywhere without his guitar rig. He would not play unless he could use his own gear.

That changed when he went on tour in the USSR and had to play on a Polish guitar. When he heard the tape the next day, he was surprised that his sound was there, no matter what guitar he played.


Pat Metheny – Guitars

Gibson ES-175N (1960)

Pat Metheny used his Gibson ES-175 for almost 20 years. He bought the guitar at a garage sale in Lee’s Summit and he has been playing it since he was 13 years old.

Pat made some modifications to the guitar, such as removing the bridge pickup and installing a Roland midi pickup. He uses a toothbrush in the guitar’s tailpiece to guide his guitar cable.

Pat says he never had any repair work done to the guitar, although it was falling apart.

To get the dark tone that he likes, he turns the tone control almost completely off.

The Gibson ES-175 was and is very popular amongst jazz musicians. Some other guitarists that used an ES-175 include Wes Montgomery and Pat Martino in their early years, Joe Diorio, Jimmy Raney, Toots Thielemans, Joe Pass, Herb Ellis, Jim Hall, Steve Howe, B.B. King, Mark Knopfler, Keith Richards, Howard Roberts, and many more.
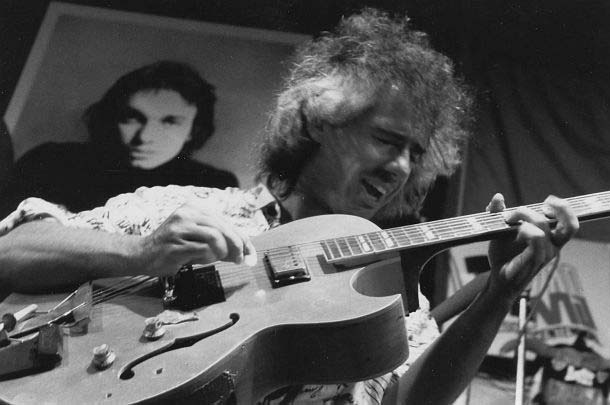
 

Pat Metheny and his Gibson ES-175


Ibanez PM100 NT – Ibanez PM100 BK – Ibanez PM120 – Ibanez PM200 NT

The Ibanez PM100 is one of Pat Metheny’s signature guitar models and is his current main guitar. He started playing Ibanez somewhere in the mid-90s when his Gibson became too fragile to travel with.

Pat Metheny owns a couple of PM100s, modified to his special needs. Besides the PM100 model with a natural finish, he also plays a black version (Ibanez PM100 BK).

On the album Live -> Trio, he plays the prototype of the Ibanez PM120, which has only one pickup (the production model has two).

Pat likes the fact that the tone control is more responsive compared to the Gibson ES-175. He doesn’t have to turn it all the way down to get the sound he likes.
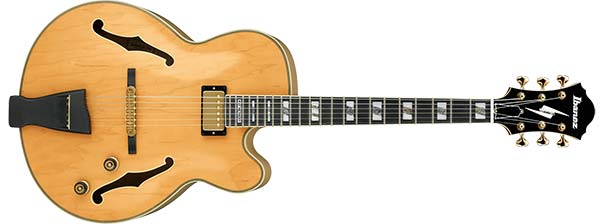
 

Ibanez PM200


Roland G-303 Guitar Synthesizer Controller + Roland GR-300

Pat Metheny uses the Roland G-303 guitar synthesizer controller 6-string in conjunction with the Roland GR-300 guitar synthesizer.

The Roland G-303 was made from 1980 to 1984 and was Roland’s most popular guitar synth controller. It is a high-quality guitar and doesn’t require guitarists to modify their playing style.
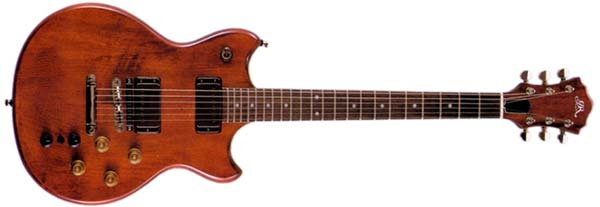
 

Roland G-303


Linda Manzer Guitars

Luthier Linda Manzer made most of Pat Metheny’s acoustic guitars in recent years.

Linda is a Canadian luthier who met Pat over 20 years ago and has been building instruments for him ever since.

According to Pat one of the reasons he began playing acoustic guitar is because of a 6 string made by Linda (called the “Linda 6” by Pat). The “Linda 6” is equipped with a Takamine pickup and was the guitar used to record Lonely Woman on the Rejoicing album.

Pat also plays on a Linda Manzer nylon string, the Manzer Pikasso guitar (42-string), the Manzer Sitar, the Manzer Baritone, the Manzer flattop 12-string, the “Little Manzer”, Manzer “The Studio”, the Manzer Mini Archtop, and more. He owns 13 Manzer guitars in total.


Other Guitars

Here are some of the other guitars used by Pat Metheny throughout the years:

  • Gibson ES-140 (Pat’s first guitar, bought for $60 when he was 11 years old).
  • Gibson ES-150
  • Fender Mustang (Pat’s second guitar).
  • 1956 Gretsch 6120 Chet Atkins
  • Höfner Zoller AZ Standard (the guitar of his friend and Hungarian jazz guitar player Atilla Zoller).
  • 1961 Gibson L-5 CES (this guitar was previously owned by Wes Montgomery, and later George Benson. It’s the guitar on the cover of Wes Montgomery’s album Movin’ Wes).
  • Guild dreadnaught cutaway (permanently in Nashville tuning).
  • 1985 Ovation 1163 Classic Cutaway
  • Sadowsky solid body nylon stringed guitar
  • Daniel Slaman DS-150/250
  • Guild D-40C
  • Paul Kinny acoustic stereo guitar
  • Coral electric sitar


Pat Metheny – Amps

Acoustic 134

Pat Metheny used this amplifier for 20 years, from 1974 to 1994.

He describes the sound as flat, kind of midrangy-bright, but mellow and loud without any distortion. The problem was that this amp was really noisy and tended to break a lot.
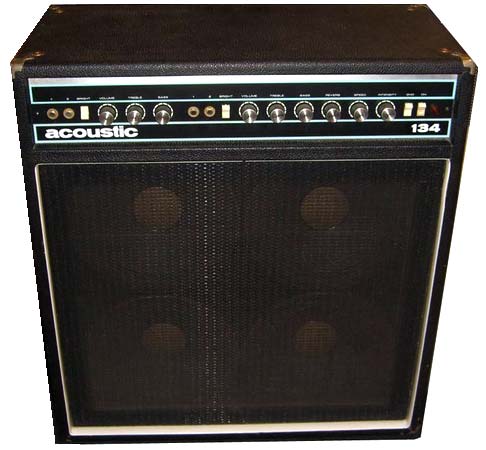
 

Acoustic 134 Guitar Amp


Digitech GSP-2101 Guitar Preamp

During his Joshua Redman tour, Pat realized he finally would have to modernize. He started trying everything and finally settled for the Digitech GSP-2101 preamp.

With this preamp, he could get his sound, reliability and some bells and whistles (mainly programmability).


Digitech GSP-2101 Preamp


Kemper Profiler

Lately, Pat Metheny has been using a Kemper Profiler in combination with Bose L1 Compact System speakers.

In his own words:

I’ve been using the Kemper for this last year and it’s been an incredible new development for me and my life as a musician. This has offered me a completely new way of getting my sound that I would not have believed possible and I’ve been having such a great time learning it as a new instrument.
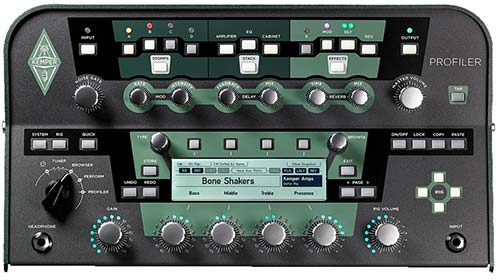
Kemper Profiler


Other Guitar Amps

  • Ashly Mosfet 200 power amp routed to JBL speakers.
  • Crest 6001 stereo power amp.


Pat Metheny – Guitar Effects

Lexicon Prime Time II Digital Delay

The output of his Digitech preamp, just like the Acoustic 134, is connected to 2 Lexicon digital delays, one on his left at 14 ms and one on his right at 26 ms. Each delay has a slight pitch bend controlled by a VCO (sine wave), which makes his guitar sound chorused.

It’s this ‘natural’ chorus that Pat is after since he doesn’t like chorus coming out of a box.


Lexington Primetime II


Roland GR-300 Guitar Synthesizer

The GR-300 is one of the first guitar synths (1979) and Pat Metheny was one of the first jazz guitarists who used it, in combination with the Roland G-303 guitar synthesizer controller.

According to Pat, this guitar synthesizer was the first one that had a musical quality to it, it picks up every detail in terms of attack and dynamics.

 

Roland GR-300 Guitar Synthesizer


Roland VG-8

The Roland VG-8 is a guitar modeling processor that emulates the sound of popular guitars, amps, and microphones. It’s a combination of a pick-up installed on the guitar and a floorboard.

Pat uses it to create synth-type sounds, on Imaginary Day for example.


Other Guitar Effects

  • Roland FC-300 Midi Footswitch


Pat Metheny – Guitar Strings

Pat Metheny uses light-gauge D’Addario strings exclusively.

  • D’Addario EXL115 Nickel Wound, Medium/Blues-Jazz Rock 11-49
  • D’Addario EJ16 Phosphor Bronze Acoustic Guitar Strings, Light, 12-53
  • D’Addario EJ21 Nickel Wound, Jazz Light, 12-52


Pat Metheny – Guitar Picks

  • D’Addario Duralin Standard – Super Light Duralin (.50mm)

 

D'Addario Duralin pick


Wes Montgomery’s Guitar Gear

Wes Montgomery

Wes Montgomery was not interested at all in guitar equipment, he saw his guitar as a tool to do the job.


In his own words:

I got a standard box. I don’t never want nothing special. Then if I drop my box, I can borrow somebody else’s.

Keep in mind that Wes Montgomery played with his thumb rather than with a guitar pick and this is a major characteristic of his guitar sound.

There are some misconceptions about Wes Montgomery’s playing and gear:

  • It is commonly thought that Wes played with his tone knob rolled off. This is not true, he was always trying to get more treble from his pickup to compensate for the mellowness of using his thumb.
  • Some sources say that his guitar amps were modified so they had a better response time. This is also not true.
  • It is said that Wes never played unplugged. This is also not the case, he practiced unplugged a lot.


Wes Montgomery – Guitars

Gibson L-5 CES EB

During his entire career, Wes Montgomery played almost exclusively on a 1963 Gibson L-5 CES (cutaway electric Spanish).

Gibson produced this guitar since 1922 and is still in production today. It was the favorite rhythm guitar in big bands.

The L5 was the first Gibson guitar with f-holes.

Gibson made 3 custom guitars for Wes Montgomery, but they only had 2 differences compared to standard L-5: 1 pickup instead of 2, which was placed upside down.

Other guitarists that use the Gibson L-5 are Tuck Andress and Pat Martino.
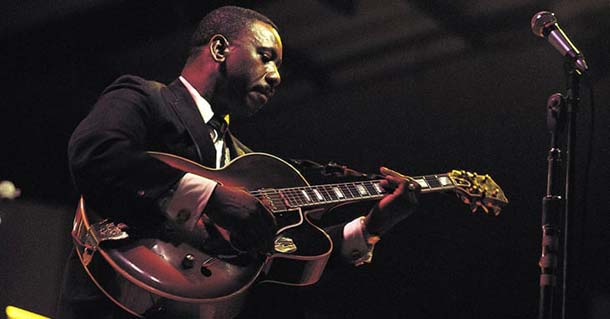
 

Wes Montgomery with his Gibson L-5 CES


Other Guitars

  • Wes Montgomery played a Gibson L-7 on the recordings of The Wes Montgomery Trio (1959). The L-7 was loaned to him by Kenny Burrell, together with a Fender Deluxe amp.
  • Gibson L-4 with a Charlie Christian bar pickup.
  • Gibson ES-175: this is the guitar he is holding on the cover of Movin’ Wes.
  • Gibson ES-125D


Wes Montgomery – Amps

Wes Montgomery never really found the amp that sounded the way he wanted it to.


Fender Super Reverb

Wes Montgomery used a Fender Super Reverb in his early years. This tube amp has 4 10-inch speakers.
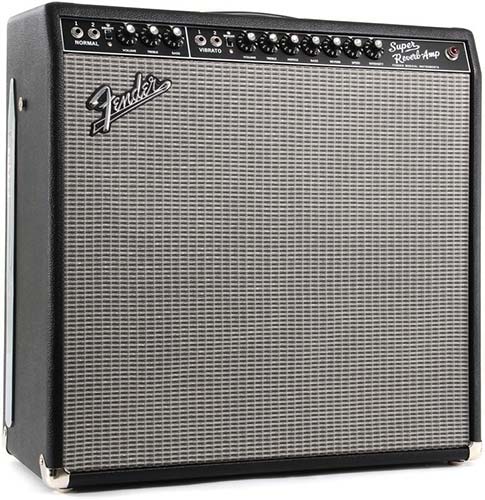
 

Fender Super Reverb


1965 Standel Super Custom XV

In his later years, Wes Montgomery played this Standel amp. The Super Custom XV has 2 channels, a normal one and a reverb/vibrato one. The amplifier has 70 watts RMS and a JBL speaker.
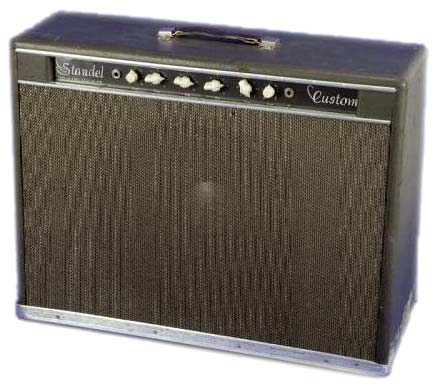
 

Standel Super Custom


Fender ’65 Twin Reverb

After the Standel, Wes played on a Fender Twin Reverb.
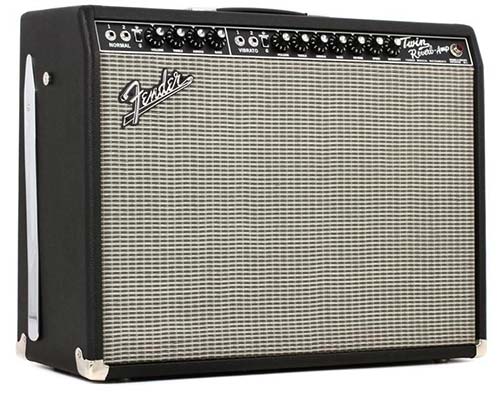
 

Fender Twin Reverb


Wes Montgomery – Strings

Wes Montgomery used Gibson HiFi Flatwound strings on his guitars going from 014 to 058.


Wes Montgomery – The Thumb

Wes Montgomery didn’t use picks, he used his thumb for picking. He once tried using a pick for some weeks, but it never produced the sound he liked, although it enabled him to play faster compared to using his thumb.

He used the fleshy part of his thumb, not his nail, and played only down strokes for single note lines and up- and down strokes for chords.

Wes had a corn on his thumb. One sound he got from the soft parts of his thumb, another more edgy one from that corn.

His thumb was double jointed, he could bend it all the way back to his wrist.

The post Famous Jazz Guitarists and Their Guitar Gear appeared first on Jazz Guitar Online | Free Jazz Guitar Lessons, Licks, Tips & Tricks..


from Jazz Guitar Online | Free Jazz Guitar Lessons, Licks, Tips & Tricks. https://ift.tt/2NxG85y